Photovision in Bryce Canyon, Utah

Added on by Paul Mullins.

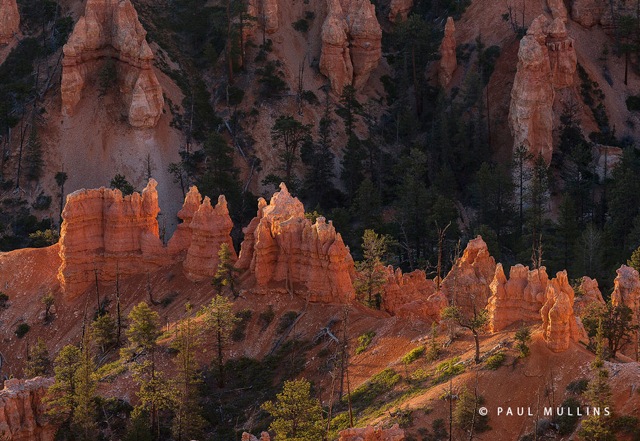
My first experience in this wonderfully serene place was with a friend and previous attendee of last years Fall Yosemite workshop, Todd Reed. He  asked me out of the blue if I would be interested in going to Bryce Canyon. Well I ended up going this last weekend and WOW the inspiration one gets from this place is off the charts. There is so much to see that you have to force yourself to slow down and experience this ever-changing drama unfolding before your eyes. Walking the rim at dawn creates an ever shifting perspective and seeing your compositions change with every step. The morning sun cast slowly changing hues and shadows that demanded my full attention. For me I saw the light as the driving inspiration. At times reflecting off the fin walls lighting the hoodoos with a soft light and also wonderful textures created from side and back lighting. Shooting from the rim I found that I kept my 70-200 mm lens on the whole morning just isolating subjects that caught my attention.


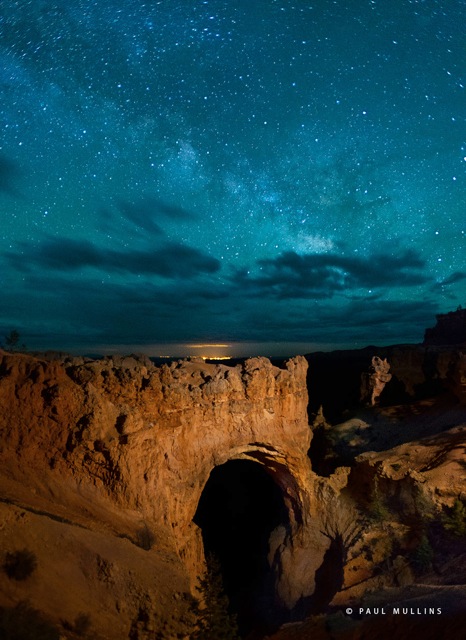
Bryce has great dark skies for new moon night time photography. Todd and I scouted for a location that had an interesting foreground and at the same time could shoot looking southeast revealing the Milky Way in the background sky. The Rainbow Arch made for our best choice. We arrived at the location around 1:00 am, there were a few clouds that threatened to postpone our efforts but cleared enough to reveal the stars. I brought along my LED light panels with warming gels and also had a Ultrastinger flashlight ready to do some light painting. My exposure was ISO 3200 for 20 sec. at F2.8 so you don’t have much depth of field at a 2.8 aperture. I have found it difficult in the past to get an accurate focus in the dark so that afternoon I found the focus for infinity on my 17mm lens and taped it down with some gaffers tape. We were out there by ourselves, not another soul for miles, unlike my experience several weeks ago where there were 120 photographers lined up at the base of Yosemite Falls shooting the moon bow at night.


I hope you enjoy a few of the images I made from this amazing trip. And Todd, Thanks again for asking me to go.

Worth the Hike

Added on by Paul Mullins.

A good friend of mine, Josh Smith and I found the well traveled trail to Upper Cathedral Lake and started our way up the hill on a three and a half mile trek to one of the most spectacular lakes in the Yosemite's Tioga Pass area. We wanted to capture the last light of the day as the sun hit Cathedral from the West with beautiful side lighting and then return back under the full moon with the aid of head lamps. Upper Cathedral Lake was a great start to our Memorial Day weekend photo trip.

Upper Cathedral Lake.jpg

Upper Cathedral Lake

sm_Tenaya Lake_.jpg

Tenaya Lake

sm_Twin Lakes Sunrise_.jpg

Twin Lakes Sunrise

sm_Homestead_.jpg

Homestead near June Lake Loop

I am really loving working with my new Nikon D800E camera. The resolution and detail is so similar to my old Hasselblad but it is about half the weight! Also I used a great new backpack that arrived the day before we left, the F-Stop Tilopa BC, perfect for day hikes with room for extra food and gear. 

The Importance of Using a Tripod - Craftsmanship

Added on by Paul Mullins.

Craftsmanship is the final "C" of the creative process. Craftsmanship can best be described as the "technical" side of photography. If you haven't read the previous posts on Communication and Composition I suggest you do so we can put all 3 C's together. The first installment on Craftsmanship is the importance of using a tripod.

72 18x24Swept Away.jpg

Two exposures were shot and combined for this photo. A 5 second exposure was shot for the sky and water, and 15 for the rocks in the foreground, both at f32. It is impossible to achieve the blurred water effect without a tripod, therefore it is vital that you use a tripod to capture longer exposures.

I love using the Gitzo GT1541 tripod (a) with a Really Right Stuff BH-40 ball head (b). The carbon fiber Gitzo tripod is ultra light weight for when I go backpacking and the quality is unsurpassable! I reccomend you hang your bag or some kind of weight on the hook in the center of the tripod just to make sure it as stable as possible. I use a medium format Hasselblad H3D2 that weighs 8 pounds with the lens attatched and my tripod supports it perfectly. I have found it is pointless to waste money on countless cheap tripods when you can invest in a quality one that will last you a lifetime.

The ball head allows me to rotate the camera smoothly to any angle I want only using one simple tightening knob. It is nice and compact as opposed to some of the bulky handles found on other heads. A fast way to attatch and detatch a camera to a tripod is to use the universal quick release clamp system. I attatch a L brackett quick release adapter (c) to my Hasselblad. It allows me to shoot both vertical and horizontal compositions while keeping my camera centered above the axis of the tripod.

A tripod is a great essential tool and allows for careful, precise composition, stability and sharp images. 

tripod.jpg

The Value of Values - Composition

Added on by Paul Mullins.

Through these first few posts I will be discussing the three C's of creative image making: Communication, Composition and Craftsmanship. My first journal entry was about Communication and how we are inspired, this next entry will be drawn from the second category of Composition.

Proper use of values is an often overlooked asset of photography. Seeing and understanding values can really give your pictures what it needs to take your photography to the next level. Simply think in terms of three different values. Dark values mid tone values and light values. You can see the use of values in both color and black and white images. Begin with a black and white photo to more easily see values in terms of black, gray and white. Ansel had 10 value steps in his zone system but I'm going to simplify it to 3 so we can see the impact this can have on your images.

First, the most boring pictures are made up of a balance of 50% of one value and 50% of another value see example #1 below.

value1.jpg

To improve the image we will add in a mid tone value and break up the 50/50 symmetry, but now notice that the black and grey are the same amount and the two combined are the same as the amount of black. Example #2.

value2.jpg

Now lets step it up a notch and make it even better by using three disproportionate values, they are different in the amount or volume of the value. This will greatly improve the interest in a composition. Example #3

value3.jpg

But, still the gray and black make up half of the volume balancing the white. Rarely achieved but the most impactful, example #4 is the optimum for creating interest. Where all values are different and there is one that dominates.

value4.jpg

You can mix up any of the values with each other, it doesn't matter which is dominate, it could be white or it could be gray as well, but the value with the least amount of volume will become your subject. To make your subject stand out you make it the value that is the least amount of the three.

This image of the Merced River is a good example of the least value being the subject. The trees lit with the side light are in the least value and become the subject. The dominate value is mid tone grays and black or the low value is the second.

bwlastlight.jpg

Here is the image in graphic form using the three values.

art lastlight.jpg

It can be hard at first to see values because we see in color, but keep practicing and it will come naturally to see that way. Shooting with the importance of values really takes a conscious effort, so put on your thinking caps and shoot intentionally!

colorLast Light.jpg

Go out and have some fun and see the value of this technique. If you have any questions feel free to contact me.

Imitation and Intuition - Communication

Added on by Paul Mullins.

“What inspires you?” is a question that always gets asked of an artist. Some artists are inspired by ideas, and people, others by music, places and books. There are many ways to be inspired, two of them are imitation and intuition. Both have their benefits. By imitation you are inspired by observing other people’s work. For example, I am inspired by the works of Ansel Adams. Ansel Adam’s tonal range, straight photography technique, classic composition and timeless quality has always inspired me. He stayed true to what photography is. His subject was the wilderness of America and it created a sense of awe and wonder in me. A few other photographers that have inspired me are Charles Kramer and my favorite photography teacher, Steve Dzergian.

When you observe photography that you like really study what it is about their work that intrigues you and how you can implement that in your own photography. Imitation is really a shortcut for inspiration, don’t get me wrong, it can be helpful, but where I really feel inspired comes from Intuition. Seeing with the eyes and shooting from the heart. This is the way we become original and express our own feelings. My ultimate inspiration comes from the sense of awe that comes from God’s glory seen in creation. When I am exploring, something will emerge that I am drawn to and intrigued by. There is a story waiting to be told there. 

Here are two exercises to stretch your intuition:

Make a list of things that you love most, things that you are passionate about and the most interested in. Now create a series of images that allow you to express that passion, your excitement and curiosity will make this project easier to do, and also more personal and gratifying. Shoot without limitations. Ignore the critical voice in your head. Don’t judge things when you first start exploring, just play and have fun.

Take a break and review your images. Now is the time to critique your work. 

Get pickier. go out to the same location you were shooting at before. This time try to only take 3 pictures that are very well thought out. Refine and simplify. Be conscious of everything you are doing. Pay attention to your point of view, light direction, composition, exposure, focus, cropping, and story telling. If it isn’t something you would hang on your wall delete it and try again.

Aspen.jpg

When I first came upon this scene of aspen trees I tried to frame the image so the fallen tree would not be included in the composition. I worked on various positions for maybe thirty minutes and they were all boring. being frustrated that it wasn’t going to be perfect I made the fallen tree the center of attention. I saw myself reflected in what I was trying to do. I learned it was okay to let others see your flaws and not try to put on a perfect facade. Perfectionism can kill your creativity and hinder relationships.